How to build a CRUD application in 2024
Discover through a concrete example, how to build a CRUD application with recent JavaScript technologies. And learn how to go beyond the MVP.


You open your eyes in complete darkness, turn to the alarm clock displaying 2:07 a.m., your brain is bubbling with excitement over your new app idea that popped into your head a few days earlier. The developer within you can't help but start conceptualizing the initial features you'll offer through the app that will serve your future business. Whether familiar or not with the CRUD acronym, you'll undoubtedly naturally gravitate towards these notions in your nightly design reflections. You're already imagining the types of data you'll need to bring to life. And just like physical objects in everyday life, this data will need to be able to be created, read, updated, and deleted over time. You're simply in the process of designing your CRUD application. CRUD stands for the elementary operations: Create, Read, Update, and Delete.
As the weekend dawns, sinking back into your sleep, you promise yourself that tomorrow you'll dive headfirst into implementing the application that could change the face of the world.
Build the Minimum Viable Product (MVP).
In search of the essentials to prototype a first version of your CRUD application, you identify three main layers that need to be interfaced with each other to provide a complete experience for a web-based user audience:
- the data persistence layer of the application,
- the Application Programming Interface (HTTP API) to expose and interact with the data,
- the web client, the interface consumed by the end user.
You start with the most fundamental: the persistence layer.
Setup the persistence layer.
You know that there are a myriad of choices available for persisting the data in your future CRUD application, and that this fundamental technical choice is not a trivial one, as it will inevitably have consequences on various aspects (performance, scalability, sharding, replication, monitoring, cost, and more). You list the obvious (because proven) technologies:
- SQL databases (MySQL, MariaDB, SQLite, PostgreSQL, Oracle, Microsoft SQL Server...)
- NoSQL databases (MongoDB, Firebase, DynamoDB, Cassandra...)
You're opting for a relational database because the initial data you'll be persisting has a constant structure and systematic relationships between them. Beyond the simple Create, Read, Update, Delete operations, this technology will allow you to benefit from powerful features (aggregates, joins, transactions, etc.) later on, if the need arises for data manipulation or visualization.
After several successful experiences with this technology, you're convinced of the power of the SQL language and thus opt for a PostgreSQL database. However, being the curious developer that you are, always eager for new technological adventures, you feel ready to try out this Cloud solution often praised by several developers in the open-space: Supabase.
This solution offers a free plan, perfect for prototyping with peace of mind.
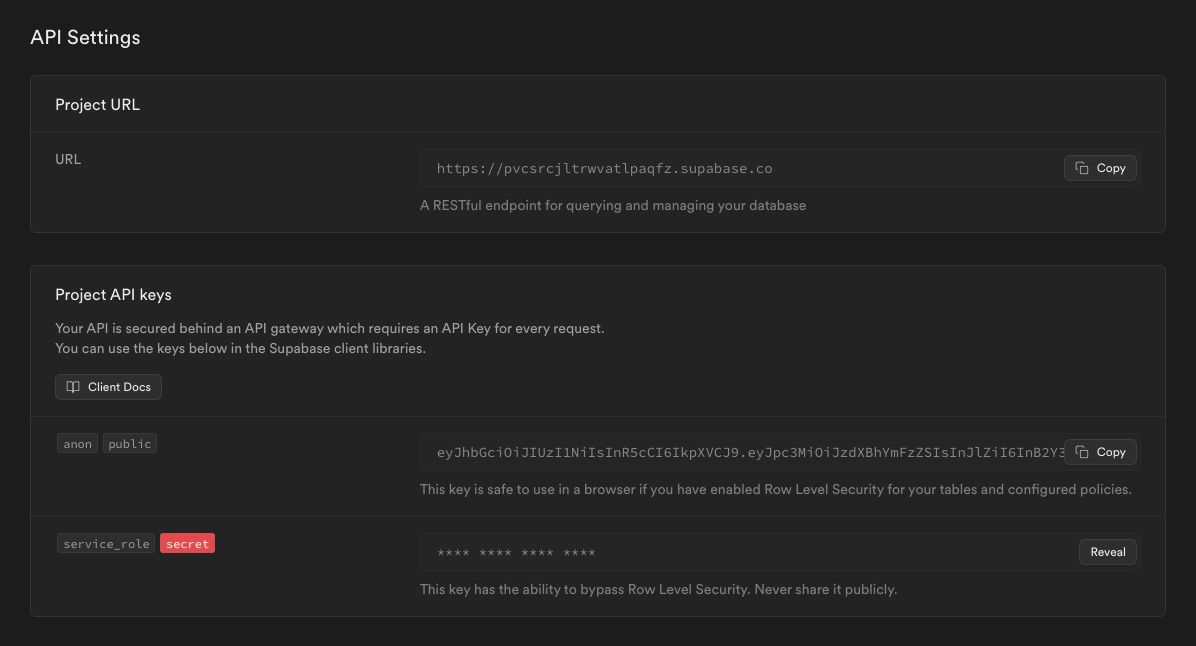
You quickly create an account, then set up your project by defining a secure password for your database, as well as the region closest to your future user base.

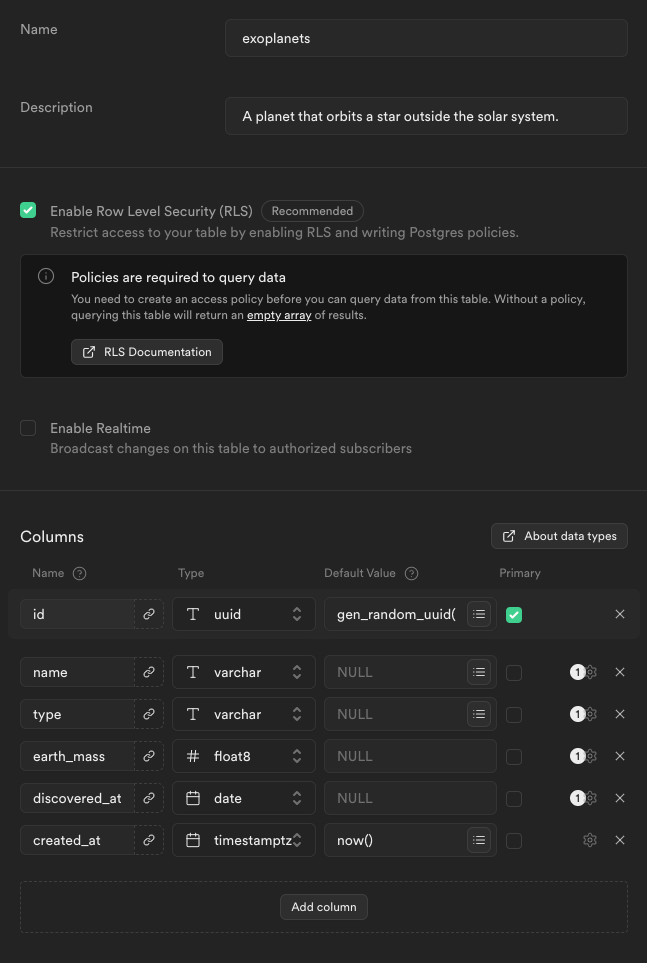
You can now start creating your first database tables to structure the core of your CRUD application. To do this, you use the "Table Editor" provided by Supabase, for quick and easy configuration.
Now that we're getting practical, it's time to start revealing your project. Your ambition is to delve into space exploration, particularly the surveying of exoplanets to validate their viability for potential human settlement. You'll need an information system to list potential planets, their stars, and the missions that will be designed for these explorations.

Tables
You start by creating the tables with the characteristics that seem relevant to you:
exoplanets→name,type,earth_mass,discovered_atstars→name,type,constellation,distance_in_light_year,solar_mass,discovered_atmissions→name,description,duration_in_years,started_at
Relationships
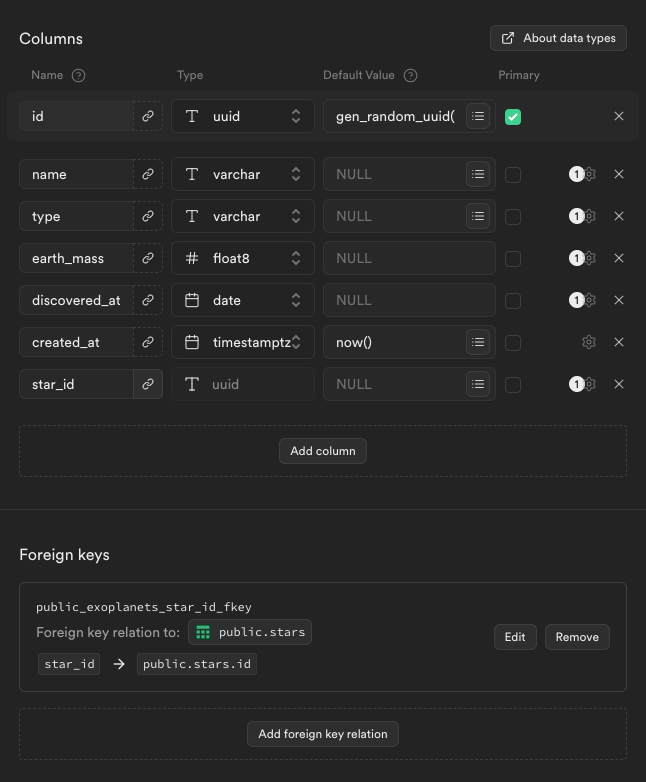
Then you add the necessary relationships between these tables:
- An
exoplanetis attached to astar, and astarcan host manyexoplanets. - A
missiontargets anexoplanet, and anexoplanetcan receive manymissions.
To do this, you add an extra column to the exoplanets and missions tables, then define foreign keys to model the constraints of these relationships between objects.
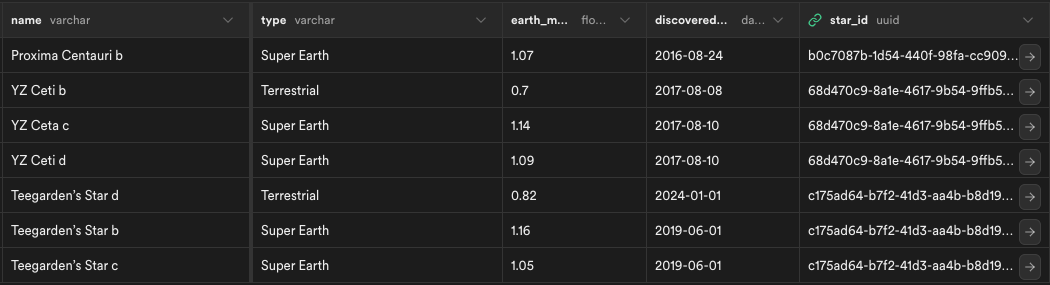
You now have the first database schema for your application, consisting of 3 tables, which are naturally empty at the moment. You spend a few minutes inserting some data manually to see if everything works as you expect.
Data
Using the insert forms on the Supabase interface, you quickly achieve this result:


Proud of these rapid initial progress, you decide to move on to building the upper layer with the development of the API.
Build the Application Programming Interface (API).
Since the beginning of your career, you've sworn by JavaScript / TypeScript, and the language has paid you back in spades. There's no reason to change for this new project: you want to be efficient. That said, the JavaScript ecosystem is very dynamic, and your frequent monitoring regularly reveals new technologies that catch your attention and that you'd like to try out.
Although Node.js has always been the default runtime in your previous projects, you had convinced yourself to give Bun a try for your next project; especially for its promises of faster code execution and a renewed development experience.
One of the hottest "bun-first" backend frameworks at the moment is ElysiaJS, with promises in line with Bun’s trend:
- performance; 21x faster than Express.js on Node.js,
- simplicity; a streamlined API,
- optional modern tooling; end-to-end type validation capabilities (with a tRPC equivalent), automatic documentation of your API, and more.

The desire to experiment with these new technologies is too strong, and you're betting on the fact that they'll be successful, even if it means sometimes forcing yourself to walk on the edge.
Server setup
You start by installing Bun with the following command:
curl -fsSL https://bun.sh/install | bashThen you initialize the application that will serve your future API, and whose name you've decided will be "Discovery":
bun create elysia discovery-apiYou instantly start the generated server:
cd discovery-api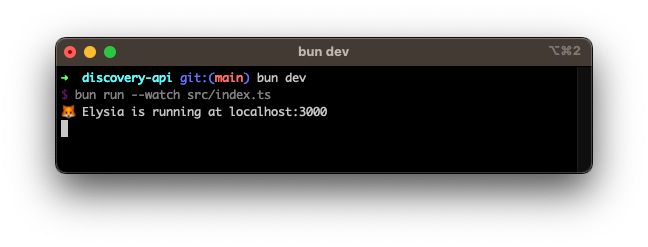
Storage setup
The fundamental building block that will be used for implementing all the routes is the persistence layer connection service. Supabase conveniently provides a JavaScript library, which you eagerly proceed to install:
bun add @supabase/supabase-jsIn a libs folder that you have previously created in the src folder of your project, you add a supabase.ts file that will initialize a client to interact with your newly created database:
import { createClient } from '@supabase/supabase-js'

const { SUPABASE_URL, SUPABASE_SECRET_KEY } = process.env;

export const supabase = createClient(SUPABASE_URL!, SUPABASE_SECRET_KEY!);
You finally define your Supabase connection environment variables in the .env.local file provided for this purpose by the framework:
SUPABASE_URL=https://<SUPABASE_DOMAIN>.supabase.co
SUPABASE_SECRET_KEY=<SUPABASE_SECRET_KEY>
You’ll replace the values of <SUPABASE_DOMAIN> and <SUPABASE_SECRET_KEY>, by fetching them from the "API" tab of your project settings in the Supabase interface.
You are now ready to implement the routes for your API.
Routes
The declaration of the API routes for your CRUD application will be done by editing the index.ts file, which was auto-generated during the project initialization. You start with the routes for interacting with the exoplanets table, one of the 3 entities in your database:
import { Elysia } from 'elysia';

const app = new Elysia()
  // Exoplanet API (Create, Read, Update, Delete)
  .post('/exoplanets')
  .get('/exoplanets')
  .get('/exoplanets/:id')
  .patch('/exoplanets/:id')
  .delete('/exoplanets/:id')
  .listen(3000);
You start by implementing the Create route, relying on the documentation provided by Supabase.
import { Elysia } from 'elysia';
import { Context } from 'elysia/dist/context';
import { supabase } from './libs/supabase'

const app = new Elysia()
  .post('/exoplanets', async ({ body }: Context) => {
    const { data } = await supabase
      .from('exoplanets')
      .insert([body])
      .select('id');
    return data ? data[0] : undefined;
  })
  .listen(3000);
You continue with the Read of the list of exoplanets:
const app = new Elysia()
  .get('/exoplanets', async () => {
    const { data } = await supabase
      .from('exoplanets')
      .select();
    return data;
  })
  .listen(3000);
You then move on to the individual Read:
const app = new Elysia()
  .get('/exoplanets/:id', async ({ params: { id }}: Context) => {
    const { data } = await supabase
      .from('exoplanets')
      .select()
      .eq('id', id);
    return data;
  })
  .listen(3000);
Then, you define the Update route:
const app = new Elysia()
  .patch('/exoplanets/:id', async ({ params: { id }, body }: Context) => {
    const { data } = await supabase
      .from('exoplanets')
      .update([body])
      .eq('id', id)
      .select('id');
    return data ? data[0] : undefined;
  })
  .listen(3000);
And finally the Delete:
const app = new Elysia()
  .delete('/exoplanets/:id', async ({ params: { id }}: Context) => {
    const { data } = await supabase
      .from('exoplanets')
      .delete()
      .eq('id', id);
    return data;
  })
  .listen(3000);
Using an HTTP client like cURL (you could also have opened Postman, to name but one), you quickly play around by making various calls to these API routes and find that the whole thing runs like a charm.
You quickly replicate these 5 routes to connect your API to the stars and missions tables. In just a few additional minutes, you finalize the first complete version of your API.
One last fundamental step remains to make your new application accessible to everyone: to provide an interface that will make the use of these CRUD actions suitable and pleasant for the humans who will be using it.

Create the User Interface (UI).
Continuing with the momentum of trying out new things, you want to find a frontend technology that is compatible with Bun. After a quick search, it turns out that Svelte Kit, a trendy framework at the moment that has caught your eye, is compatible.

You waste no time and and immerse yourself, for a few dozen minutes, in the tutorial introducing the key concepts, before putting your hands back on the keyboard to put theory into practice.
Setup
In just a few command lines, you create the project to develop your frontend application:
bun create svelte@latest discovery-app
cd discovery-app
bun install
bun run dev -- --open
The framework is pretty straightforward to grasp, especially as your requirements are clear and limited. You want the users of your application to be able to create, list, view, update, and finally delete your objects, based on the implemented, and now exposed, API.
You know from experience that you'll need different pages to offer a comfortable user experience, and links between these pages to navigate from one action to another:
- a home page to choose the category of object to interact with,
- a page to list objects of the same category, allowing navigation to all other pages to manipulate these objects,
- a form to create a new object of this category,
- a page that details information about an existing object and offers the option to edit or delete the object permanently,
- a form to edit an existing object of the category.
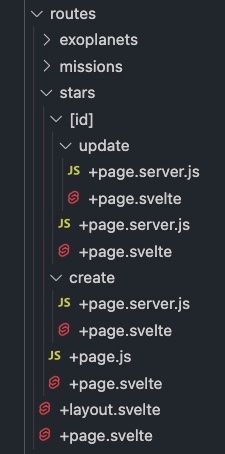
You start by structuring the URLs of your pages and organize your files according to the framework's conventions. Here's what it looks like, for example, for the stars:
| Page | URL | Folder |
|---|---|---|
List stars |
/stars | src/routes/stars |
Create star |
/stars/create | src/routes/stars/create |
Show star |
/stars/[id] | src/routes/stars/[id] |
Update star |
/stars/[id]/update | src/routes/stars/[id]/update |
The Delete star action will be performed directly through an action on the Show star page.
In each folder, you define a template file (+page.svelte) and a control file (+page.server.js), again following the framework's conventions, to implement these pages.
List Page
You start by implementing the list of stars, and to do that, you implement the load function in the controller file. Once implemented correctly, this function will allow you to access the stars data in the template.
To achieve this, you use the fetch API to retrieve the information, specifying content-type: 'application/json' in the request headers. Then, you return to the template the list of stars within an object:
export async function load() {
  const response = await fetch('http://localhost:3000/stars', {
    headers: {
      'content-type': 'application/json',
    },
  });

  return {
    stars: await response.json(),
  };
};
Unfortunately, it doesn't work on the first try. You quickly realize that the implemented API is refusing to return responses to your browser. The reason is simple: Cross-Origin Resource Sharing (CORS). All browsers implement this mechanism which systematically checks whether the requested resource can be read for the domain used by the client application before executing the data retrieval request and sending a response. At this point, the API doesn't seem to let it go.
You're familiar with these constraints and find out what ElysiaJS has to offer to manage these security configurations. ElysiaJS provides a system of plugins to avoid re-coding generic functionalities. You just find the CORS plugin to solve your problem and manage it on your API. You install it at lightning speed (on the API side, of course) using the following command:
bun add @elysiajs/corsThen you modify the index.ts file so that the server accepts requests regardless of the browser's domain. This may not be the recommended configuration for production servers, but it allows you to continue developing your Minimum Viable Product:
import { Elysia } from 'elysia';
// ...
import { cors } from '@elysiajs/cors'

const app = new Elysia()
  // ... API Routes
  .use(cors()) // By default, any origins are allowed.
  .listen(3000);
With this configuration, the frontend application is now able to load the stars list correctly. You now define the template of the page in the +page.svelte file. The data object contains what is returned by the load function defined in the controller. You iterate over the list of objects via data.stars to display the content in a <table> tag:
<script>
  export let data;
</script>

<h2><a href="/">Home</a> > Stars</h2>

<a href="stars/create">create</a>
<table>
  <tr>
    <th>Id</th>
    <th>Name</th>
    <th>Type</th>
    <th>Solar mass</th>
    <th>Constellation</th>
    <th>Distance in light year</th>
    <th>Discovered at</th>
    <th>Created at</th>
    <th>Actions</th>
  </tr>
  {#each data.stars as { id, name, type, solar_mass, constellation, distance_in_light_year, discovered_at, created_at }}
    <tr>
      <td>{id}</td>
      <td>{name}</td>
      <td>{type}</td>
      <td>{solar_mass}</td>
      <td>{constellation}</td>
      <td>{distance_in_light_year}</td>
      <td>{discovered_at}</td>
      <td>{created_at}</td>
      <td>
        <a href="stars/{id}">read</a>
        <a href="stars/{id}/update">update</a>
      </td>
    </tr>
  {/each}
</table>
With a few extra lines of CSS, you get this result.

The first section, from the top of the page, will allow users to navigate to the "parent" pages. The table below displays a header for each attribute of the stars object and lists, in the following lines, all the stars returned by the API. The "create", "read", "update" buttons will allow users to navigate to the pages that will complete your CRUD application, and that you still need to implement.
Create Page
Unlike the first implemented page, this page does not load any data, but presents an empty form to create a new star via the API.
You implement this form using pure HTML with <form>, <label>, and <input> tags:
<h2><a href="/">Home</a> > <a href="/stars">Stars</a> > New</h2>

<form method="POST">
  <table>
    <tr>
      <td>
        <label for="name">Name</label>
      </td>
      <td>
        <input id="name" name="name" />
      </td>
    </tr>
    <tr>
      <td>
        <label for="type">Type</label>
      </td>
      <td>
        <input id="type" name="type" />
      </td>
    </tr>
    <tr>
      <td>
        <label for="solar_mass">Solar mass</label>
      </td>
      <td>
        <input id="solar_mass" name="solar_mass" />
      </td>
    </tr>
    <tr>
      <td>
        <label for="constellation">Constellation</label>
      </td>
      <td>
        <input id="constellation" name="constellation" />
      </td>
    </tr>
    <tr>
      <td>
        <label for="distance_in_light_year">Distance in light year</label>
      </td>
      <td>
        <input id="distance_in_light_year" name="distance_in_light_year" />
      </td>
    </tr>
    <tr>
      <td>
        <label for="discovered_at">Discovered at</label>
      </td>
      <td>
        <input id="discovered_at" name="discovered_at" />
      </td>
    </tr>
  </table>
  <input type="submit" value="Create" />
</form>
and achieve this result:

You finish by implementing the action to execute, upon form submission, in +page.server.js. Leveraging Svelte conventions, you implement the actions.default function:
import { redirect } from '@sveltejs/kit';

export const actions = {
  default: async ({ request }) => {
    const form = {};
    const data = await request.formData();

    for (const [key, value] of data.entries()) {
      if (value) {
        form[key] = value;
      }
    }

    await fetch('http://localhost:3000/stars', {
      method: 'POST',
      headers: {
        'content-type': 'application/json',
      },
      body: JSON.stringify(form),
    });

    throw redirect(303, '/stars');
  }
};
The function takes an object Request as input. In a few lines of code, you format the JSON of the values of the new object which will be inserted into the body of the POST request triggered by the fetch call defined just after. Finally, you use Svelte Kit's API to redirect to the list of stars immediately after creating the new object.
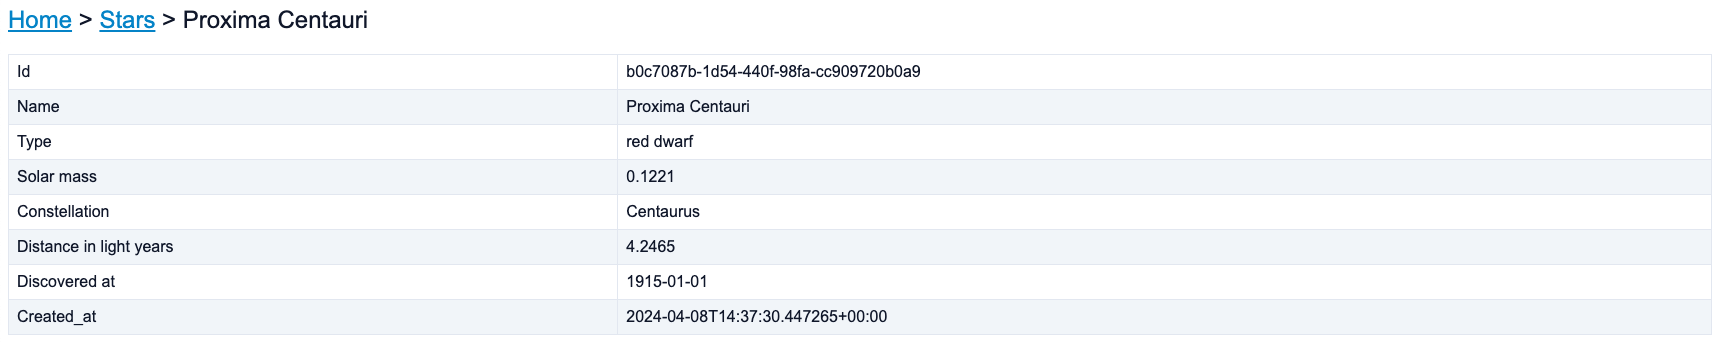
Show Page
Like the list page, this page implements the load function in its +page.server.js controller to load the object requested by the user. You know the drill, and you progress quickly. The only notable difference is the retrieval the object's id to be found in the URL context using the params exposed by the load function's API:
export async function load({ params }) {
  const response = await fetch(`http://localhost:3000/stars/${params.id}`, {
    headers: {
      'content-type': 'application/json',
    },
  });
  const stars = await response.json();
  return {
    star: stars[0],
  };
};
Keeping the idea of a table-based presentation, the associated template is simple to set up:
<script>
  export let data;
</script>

<h2><a href="/">Home</a> > <a href="/stars">Stars</a> > {data.star.name}</h2>

<table>
  <tr>
    <td>Id</td>
    <td>{data.star.id}</td>
  </tr>
  <tr>
    <td>Name</td>
    <td>{data.star.name}</td>
  </tr>
  <tr>
    <td>Type</td>
    <td>{data.star.type}</td>
  </tr>
  <tr>
    <td>Solar mass</td>
    <td>{data.star.solar_mass}</td>
  </tr>
  <tr>
    <td>Constellation</td>
    <td>{data.star.constellation}</td>
  </tr>
  <tr>
    <td>Distance in light years</td>
    <td>{data.star.distance_in_light_year}</td>
  </tr>
  <tr>
    <td>Discovered at</td>
    <td>{data.star.discovered_at}</td>
  </tr>
  <tr>
    <td>Created_at</td>
    <td>{data.star.created_at}</td>
  </tr>
</table>
And here's what you get:
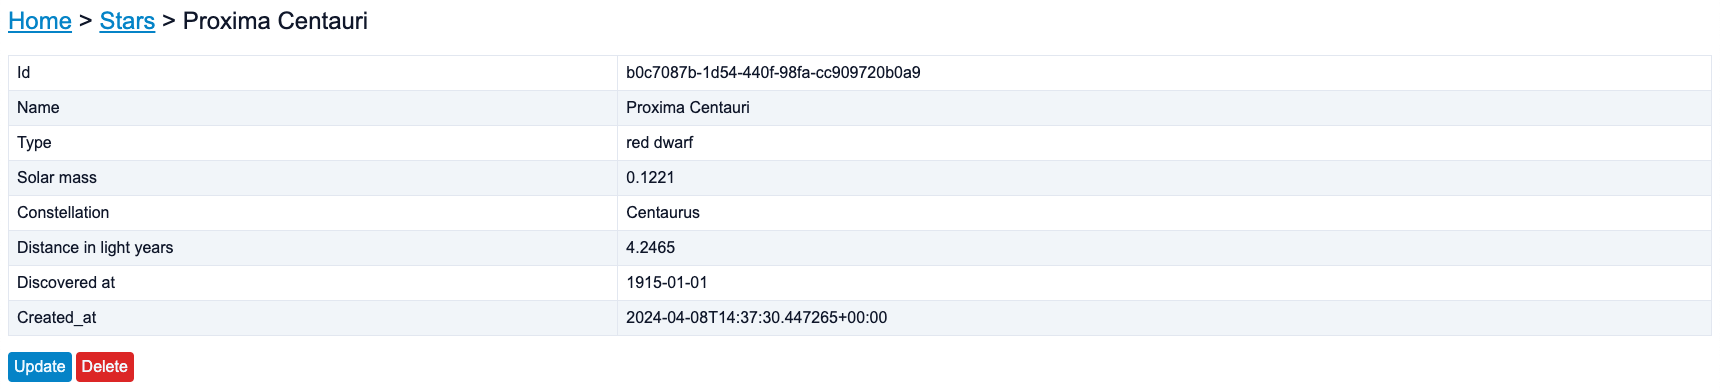
Delete Action
You decide to add the object destruction action in the Show page, so as not to make this action too easily accessible (i.e. directly from the List page).
You make a small addition of a minimalist form in the template at the bottom of the page:
<form method="POST">
  <input type="hidden" id="id" name="id" value={data.star.id} />
  <input type="submit" value="Delete" />
</form>
And the implementation of the action in the associated controller is done in the same way as the actions.default function for the creation form:
import { redirect } from '@sveltejs/kit';

export const actions = {
  default: async ({ request }) => {
    const data = await request.formData();
    const id = data.get('id');

    await fetch(`http://localhost:3000/stars/${id}`, {
      method: 'DELETE',
      headers: {
        'content-type': 'application/json',
      }
    });

    throw redirect(303, '/stars');
  }
};
You redirect, once again, to the list of stars once the deletion action has been completed.
By adding a navigation button to the Update page in the template:
<div>
  <a href="/stars/{data.star.id}/update">Update</a>
  <form method="POST">
    <input type="hidden" id="id" name="id" value={data.star.id} />
    <input type="submit" value="Delete" />
  </form>
</div>
You achieve this final result:
All that remains is to implement the Update page, and your application will be fully functional for stars objects.
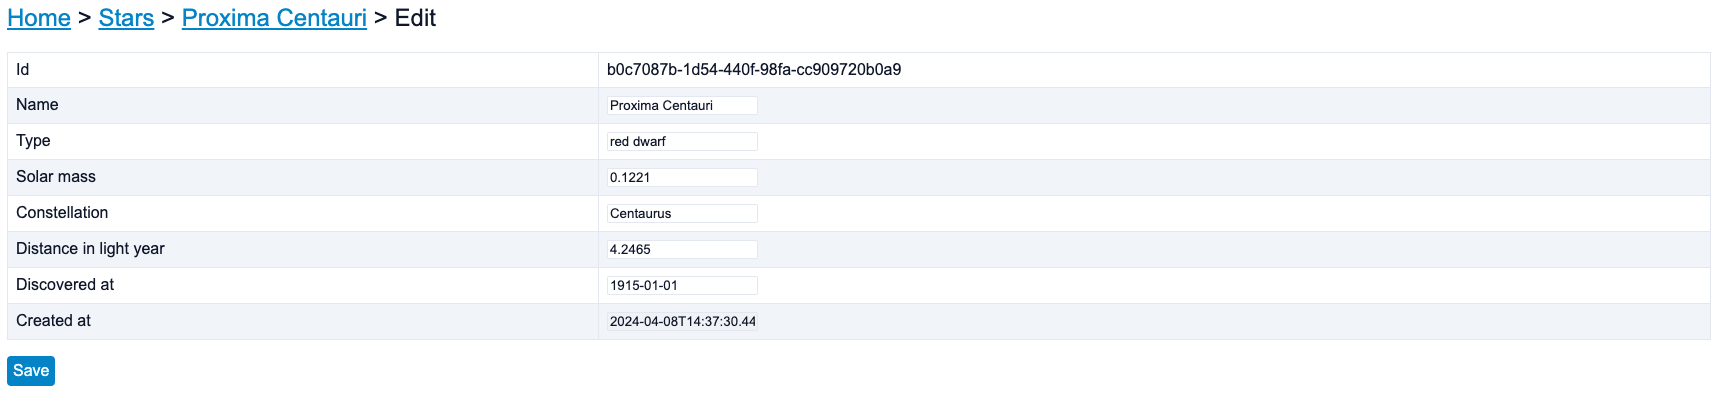
Update Page
The Update page is very similar, in design, to the Create page. All you need to do is to add the current values of the target object into the inputs. Naturally, the templates and controllers of the Create and Update pages will be very similar.
Here's your template:
<script>
  export let data;
</script>

<h2><a href="/">Home</a> > <a href="/stars">Stars</a> > <a href="/stars/{data.star.id}">{data.star.name}</a> > Edit</h2>

<form method="POST">
  <table>
    <tr>
      <td>
        <label for="id">Id</label>
      </td>
      <td>
        {data.star.id}
        <input id="id" name="id" value="{data.star.id}" type="hidden" />
      </td>
    </tr>
    <tr>
      <td>
        <label for="name">Name</label>
      </td>
      <td>
        <input id="name" name="name" value="{data.star.name}" />
      </td>
    </tr>
    <tr>
      <td>
        <label for="type">Type</label>
      </td>
      <td>
        <input id="type" name="type" value="{data.star.type}" />
      </td>
    </tr>
    <tr>
      <td>
        <label for="solar_mass">Solar mass</label>
      </td>
      <td>
        <input id="solar_mass" name="solar_mass" value="{data.star.solar_mass}" />
      </td>
    </tr>
    <tr>
      <td>
        <label for="constellation">Constellation</label>
      </td>
      <td>
        <input id="constellation" name="constellation" value="{data.star.constellation}" />
      </td>
    </tr>
    <tr>
      <td>
        <label for="distance_in_light_year">Distance in light year</label>
      </td>
      <td>
        <input id="distance_in_light_year" name="distance_in_light_year" value="{data.star.distance_in_light_year}" />
      </td>
    </tr>
    <tr>
      <td>
        <label for="discovered_at">Discovered at</label>
      </td>
      <td>
        <input id="discovered_at" name="discovered_at" value="{data.star.discovered_at}" />
      </td>
    </tr>
    <tr>
      <td>
        <label for="created_at">Created at</label>
      </td>
      <td>
        <input id="created_at" name="created_at" value="{data.star.created_at}" disabled />
      </td>
    </tr>
  </table>
  <input type="submit" value="Save" />
</form>
You make sure that the id and technical date created_at are not editable, as they are supposed to be immutable.
The controller loads the object to display via the load function, handles the update action via the actions.default function, and redirects this time to the Show page of the object once updated. Here's the final code of the +page.server.js controller for the Update page:
import { redirect } from '@sveltejs/kit';

export async function load({ params }) {
  const response = await fetch(`http://localhost:3000/stars/${params.id}`, {
    headers: {
      'content-type': 'application/json',
    },
  });
  const stars = await response.json();
  return {
    star: stars[0],
  };
};

export const actions = {
  default: async ({ request }) => {
    const form = {};
    const data = await request.formData();

    for (const [key, value] of data.entries()) {
      if (value) {
        form[key] = value;
      }
    }

    await fetch(`http://localhost:3000/stars/${form.id}`, {
      method: 'PATCH',
      headers: {
        'content-type': 'application/json',
      },
      body: JSON.stringify(form),
    });

    throw redirect(303, `/stars/${form.id}`);
  }
};
You have just finished your Update page:
After a few dozen minutes of additional work, you implement similar pages for the exoplanets and missions objects.
You thus complete your MVP of CRUD application, feeling a sense of accomplishment. It wasn't that complicated, was it?

You are fully aware that you won't get very far with this application. Now comes the time for real challenges, where you'll need to put in regular efforts to hope to provide, in the long term, a reliable and efficient application.
Deliver a serious CRUD application.
Your many years of collaboration in the web development world have made you aware of the complexity required to move from the current MVP to a much more refined CRUD application that would meet quality standards in terms of user experience, performance, and security. The topics are almost countless, but you've decided to do some listing work to get a clearer picture.
Empower the CRUD usage with additional must-have features.
On the purely functional aspect, you know that many shortcuts have been taken, and the most obvious ones come to mind spontaneously.
Read
Regarding the Read operations, and more specifically the list of objects to be displayed, many obvious features are necessary:
| Feature | Description | How to? | Benefits |
|---|---|---|---|
| Pagination | Ensures that a limited number of objects will be served and displayed (and not all persisted objects). Provides an additional navigation experience allowing users to move from one page to another or to scroll infinitely. | You'll adapt your API to take this context into account and use the range function provided by Supabase in your controllers, then add to the interface a component that allows navigation from one page to another in the list. | Performance & Scalability |
| Search | Allows users to search for objects in the list based on a heading to quickly find a specific object that contains occurrences of the entered term in its attributes, and then interact with it. The search functionality can be precise or "fuzzy," case-sensitive, or case-insensitive depending on the needs. | You'll adapt your API to take this context into account and use the textSearch function provided by Supabase in your controllers, then add to the interface a component that allows entering a search query. | Operational efficiency |
| Filters | Allows for more detailed searching of objects based on specific attributes. Each attribute, by virtue of its type (string, date, number, etc.), receives a more or less extensive set of operators with which it is compatible (contains, greater than, equals, etc.). | You'll adapt your API to support the different operators and use the various filter functions provided by Supabase in your controllers, then add to the interface a component for configuring filters. This functionality is certainly the most extensive and therefore the most complex to implement. | Operational efficiency |
| Scopes | Provides subsets of a list of objects (using filters) that generally make sense operationally to place users in the right context, with a focus on the type of objects in a specific state and on which interactions will be necessary. It also potentially restricts the objects that will be accessible to users. | This functionality is very close to the filters one, once you master the filter operators provided by Supabase, you'll be able to define scopes at the controller level according to your needs. | Operational efficiency |
| Sort | Allows to order the objects in a list based on one or more attributes in ascending or descending order to ease visualization and usage. This configuration can be defined by default and potentially adaptable for specific usage if necessary. | You'll adapt your API to take this context into account and use the order function provided by Supabase in your controllers, then add to the interface an action in each column header to allow ordering objects based on the target column in ascending or descending order. | Operational efficiency |
| Contextual links | Provides an anchoring on a navigation context that allows users to collaborate by sharing observations on a specific object or list of objects presented in a particular state, relying in particular on the previously mentioned features (pagination, search, filters, sort, etc.). | You'll ensure to implement the support of the context in your frontend application URLs, especially through query parameters. You'll leverage the URLSearchParams exposed by SvelteKit, and ensure that the context is correctly passed in server requests during page initializations. | Collaboration |
Write
When it comes to the Write operations, there is also a set of features that will enable efficient usage when creating or updating an object:
| Feature | Description | How to? | Benefits |
|---|---|---|---|
| Default values | Defines default pre-filled values based on business flows to accelerate the creation of objects, while allowing the operator to freely modify these values as needed. | By using the value attribute on your input tags, you will be able to set initial values for the fields you want. |
Operational efficiency & User experience |
| Disable inputs | Allows to indicate to the user, in creation or editing forms, the fields on which they cannot interact due to system constraints. | By using the disabled attribute on your input tags, you'll prevent the user from focusing on or editing the fields that need to be protected in your forms. |
Data consistency & User experience |
| Validation | Ensures consistency of the entered data, based on the type of attributes and the constraints defined on them (mandatory presence, uniqueness, business constraints on values, etc.). Also guides the user effectively (ideally as early as possible) to ensure correct input and, if it is not, that the user understands what is expected. | To guide the user, as early as possible, you'll make your form dynamic by notifying validation errors as soon as they are detected. Using specific CSS style on the relevant input and providing clear and intelligible error messages nearby, the user should be able to correct their input. Additionally, technical validations at the API and data source level should ideally be implemented. ElysiaJS can assist with this through the definition of Schema Types. | Data consistency & User experience |
| Error Management | Provides an abstraction level to explain to the user the reasons for a writing error on one or several objects, and make them autonomous in resolving it. | The objective will be to systematically display explicit error messages in the error responses sent by the API. The frontend, on its part, should ensure that the message can be displayed in a dedicated area of the interface, for a long enough duration to be read by the user. | Operational efficiency & User experience |
| Edit relationships | Provides an interface to modify the relationships defined between objects, to detach them from parent or child objects in order to reassign them to other objects or leave them orphaned. This type of interface requires the ability to break a relationship and/or efficiently search in a target collection for objects to attach to the current object. | The implementation will depend on the type of relationship involved. If it is a one-to-one relationship, you will need to implement an input in the form of a dropdown that allows searching within the target collection for objects that could be attached, and then selecting or deselecting an attached object. For a one-to-many relationship, you will need to go a step further with an input that allows for multiple selection and deselection. | Operational need |
| Duplication | Creates a new object based on an existing one to speed up data entry (compared to filling out a completely empty form). This feature can improve users efficiency if this use case is common and if the objects to be created have many attributes in commun with existing objects. This is especially true if this type of object contains a large number of attributes that may take a long time to enter. | You'll need to retrieve the values of the original object to prefill them (again using the value attribute on your input tags) in the creation form. The user will, then, be able to adjust the values as needed before creating the new object. |
Operational efficiency |
You know that many of these features are fundamental for your application to approach operational excellence. You also know that these features will, in turn, considerably increase the complexity of your codebase. It will be necessary to structure these different logics correctly, and your experience makes you confident in your ability to achieve this successfully.

Secure your application with an authentication system.
At this stage of development, if you were to deploy this application on the web, any individual with internet access and knowledge of the URL of your frontend application could use your CRUD application to read and write at will and in total anonymity. This is something you must obviously protect your application from.
The simplest feature you can implement to enforce access control to your application is the HTTP Basic Authentication; the access is then conditioned on entering a unique username and password. However, beyond the questionable security of its use (sharing unique credentials among all users, unencrypted credentials during request transit, etc.), you know that this solution will not allow a mature management of future users of your application.
You want to be able to clearly define which physical operators you are going to grant access to your application. You want to be able to add or remove users over time as your project and teams evolve. So, you will need to implement an authentication system with complete user management.
To achieve this, you'll need to define the notion of users in your application to identify your operators. Then, you'll need to:
- provide each of them with a unique identifier (usually their email address),
- allow inviting these users (preferably by email, to validate the validity of their email),
- allow them to set a secure password with constraints you’ll have to define (length, special characters, etc.) during the invitation flow,
- enable access to the application by providing a valid identifier and password,
- define rules for the duration of connection sessions in the application,
- allow users to reset their password later if they forget the existing one,
- ...
You will therefore necessarily have to implement the services and dedicated pages (invitation, sign in, reset password, etc.) which will accompany all this functional scope.

User session management also needs to be approached with thoughtful technical and functional choices. And the topic is sensitive as it involves the security of your application.
Restrict Actions with a Role-based access control.
Once your authentication system is implemented, you know that you can now consider controlling your users' access in a granular way.
The need to control access to different resources is not currently a necessity but will likely be felt as soon as you invite multiple users to your CRUD application. Due to the diversity of user profiles and their roles in your project, these operators will not have the same needs and actions in the application. You will seek to identify these use cases, which will probably allow you to identify concrete roles. Finally, for the sake of data consistency and security, you will restrict access to resources based on roles, applying the Principle of Least Privilege.
Your researchers and astronomers will have Read, Create, and Update rights on stars and exoplanets. Meanwhile, your mission planners will have Read, Create, Update, and Delete rights on missions. It may not make sense to assign Delete rights on stars and exoplanets since, once discovered by the scientific community, their physical presence will not be disputable (except for database entry errors... or scientific discovery mistakes).
You will thus naturally create a role-based access control (RBAC) system. Only identified operators and, now, authorized through a specific role assigned to them, will be able to Read and/or Create and/or Update and/or Delete a resource.

You may consider creating more granular access authorizations if the usage of your application becomes more refined: authorizing Read access to a resource within a particular scope, deciding that certain attributes should not be accessible to certain roles, or specifying that the Update can only be performed on specific fields depending on the role.
At this stage, your application will have reached a certain level of maturity in terms of access security, but it's really just the bare minimum for an application worthy of the name. When it comes to security, there are many, many topics to consider.
Don't skimp on security.
You finalize your list of necessary features to reach a real maturity, focusing ultimately on the security dimension.
Transit Encryption
In order to ensure confidentiality, authenticity and integrity, you will need to transition from the HTTP protocol (the one used to implement your MVP) to HTTPS (via TLS). Because you want to guarantee:
- that the data in transit and the activity of your operators are kept as hidden as possible,
- that the interactions between the client application and the API are not intercepted and potentially modified/impersonated,
- that the exchanged data cannot be modified.
The idea being to protect your application as much as possible from potentially malicious entities, the day your application will be accessible on the Internet.
Data Encryption at Rest
On the data persistence side, a common practice is to encrypt your databases. The main advantage is that in case of a database breach, the data cannot be read (unless the encryption keys are also stolen).
Supabase guarantees this for all their databases on their security page, so you're presumably in good hands here.
Multi-Factor-Authentication
Password authentication is a first guarantee of secure authentication, if the generated password is sufficiently complex. However, you know it is susceptible to attacks (credentials theft, brute force, etc.) and that, as the sole factor of authentication, it exposes the user to a risk that can be moderated. That's why for several years now, sensitive web applications have required their users to use multi-factor authentication. If one factor is discovered by a hacker, the others will protect you from a malicious access to your application.
The most commonly encountered solutions in the web universe are:
- Time-based one-time password (TOTP) which requires the use of a third-party application (typically installed on a smartphone, Google Authenticator being an example) that generates time-limited passwords that must be entered by users,
- Sending a temporary code via email or SMS, which needs to be entered by users,
- Using your fingerprint, which is accessible on many modern computers and smartphones.
Like any security increment, this will make the user experience more complex during the account creation and, then, at each authentication, and will also bring its share of new complexities (installation, education, management of loss of access to certain factors, etc.).
Anti Brute Force Mechanism
For the security of your CRUD application, you will also need to limit or slow down unsuccessful authentication attempts. The API routes that handle authentication validation will have to stop functioning after a certain number of unsuccessful attempts through an anti-brute force mechanism. The idea is that if authentication fails after several attempts, there is a high chance that the entity behind these attempts is not the expected person. Various more or less restrictive strategies exist to deal with these repeated failures and potentially allow the user to retry within a specified timeframe.
IP / Device Whitelisting
Going even further, whitelisting IP addresses or devices, meaning maintaining an exhaustive list of IP addresses or devices authorized to connect and consume resources, represents an additional layer of security to protect against intrusion attempts from unknown IP addresses or devices.
Regular Sanity Checks
Once all these features are listed, and regardless of the depth of the responses you will provide in your application, you will naturally need to protect it from regressions. Your codebase will evolve and likely grow organically, and you will need to manage this by protecting the application as much as possible from security regressions. Many things can be put in place in development activities, you list the ones that seem most obvious to you:
- Setting up a base of automated tests, at the very least for the main security features (authentication, authorization) by simulating attack attempts. You could also expand this tests base to cover other types of attacks (such as injections, to name one).
- Implementing a vulnerabilities monitoring tool for the dependencies used in your codebase. Vulnerabilities in libraries used in your codebase will be regularly detected, with varying levels of criticality (critical, high, moderate, low, etc.). and it's crucial for the security of your CRUD application to be able to receive alerts and address them promptly (if patches have already been released for these libraries). It will ensure that your codebase remains healthy and up-to-date, reducing the chances of attacks on your application.
- Configuring and storing the access logs of your application to enable you to detect, in real-time or retrospectively, any suspicious usage that could reveal threats or vulnerabilities, and assist in investigating potential exploits that may have taken place.
- Scheduling an audit of your application by a third-party organization and/or creating a bug bounty program. In both cases, this will allow cybersecurity experts to conduct intrusion attempts (pentesting) and inform you of any vulnerabilities detected so that you can patch them. Conducting these exercises regularly will provide you with a consistent challenge of the security of your platform and give you the opportunity to strengthen it, providing reassurance to your organization.
You stop there, realizing that it will take you months, if not years, to reach this level of security rigor within your organization, but that's nothing compared to your insatiable ambition to discover the first habitable exoplanet for humankind...

Go beyond CRUD.
Creating a CRUD application in the early stages of a project is certainly a good idea. This application will allow you to support your first operational use cases in a direct and flexible way by interacting directly with your data sources.
However, this will also require operators to have a good understanding of how the systems that use this "low-level" data operate, so they can manipulate, with care, a minimum set of data with CRUD actions, and likely in a very specific order. Otherwise, you risk corrupting data and potentially compromising the core of your application system.
Later, as your business and operational processes mature, the number of operators and the diversity of their roles grow, you'll likely start to specialize the flows and actions possible in your application. You'll also seek to promote and streamline collaboration among all operators for optimal team performance. You decide to expand your thoughts on this matter.
Need business oriented actions?
As your operational needs become clearer, you'll realize that the operational actions expected from your operators typically involve a precise sequence of CRUD actions on various types of objects in your databases. They represent a flow sensitive to human errors if not properly managed.
Your interest in the robustness and operational efficiency of your organization will be to identify these flows and build business-oriented actions. You will then be able to define specific forms corresponding to the flows of your actions. These forms, once filled out and submitted, will be processed by controllers implemented with specific logic to handle these business cases, editing the various underlying objects in an orderly and consistent manner.
This will, then, give you the freedom to connect, to these specific controllers, features that meet peripheral operational needs:
- trigger asynchronous tasks, for business actions that would naturally take time to execute,
- send events to third-party tools, to ensure the consistency of your operational data across your entire platform,
- notify users impacted by the triggered action and keep your organization running smoothly,
- enable consistent and global editing of your data by using transactions, which would allow you to rollback an entire execution flow at the slightest validation error.
example: Let's imagine that an astrophysicist in your organization discovers, through new measurements, that an exoplanet targeted by a mission currently being designed is not of the "Terrestrial" type but in fact of the "Gas Giant" type. They decide to trigger the business-oriented action, titled "Change type," on the exoplanet in question. Changing it from "Terrestrial" to "Gas Giant" will automatically target the missions associated to this exoplanet to adapt their status in the database and inform planners to halt their mission study project.

Just like in the physical world, every change in the state of an entity will have consequences on what orbits around it.
Need collaboration?
You will sooner or later receive requests from your operators aiming to improve their collaboration through visualization, information sharing, approval, or assignment.
Here is a (non-exhaustive) list of features that could help all collaborators on your application (administrators, managers, operators, etc.) to collaborate better with a focus on efficiency, security, and operational transparency.
Users Management
The administrators of your application, through their own use of the platform, will gradually express their needs to improve their efficiency in managing operators, their roles, and their permissions. Among the most obvious features, administrators will need to be able to:
- list, search, and view all operators and their information,
- invite new operators,
- revoke access for operators who no longer operate on the platform,
- list defined roles and permissions,
- create new roles and their associated permissions,
- modify permissions associated with a role,
- delete roles.
You will most likely have to implement these pages in an administration section of your application. This section will only be accessible to certain roles; those with advanced administration rights.
example: An administrator will be able to invite new astrophysicists, as your organization grows, assigning them a role that allows them to edit stars and exoplanets. On the other hand, the design and definition of missions will be entrusted to planners.
Audit Trail
The audit trail feature will allow you to visualize the complete history of events triggered by all operators on your platform. Generally focused on the entries made on your system, an audit trail will bring you various benefits:
- readability and transparency regarding what is actually executed by your operators,
- provision of context on a specific object through the historical record of operational actions taken over time,
- investigation of potential issues detected on the platform,
- approval of your activities for potential regulatory purposes.
You'll need to ensure their long-term retention, probably make them exportable for later manipulation. And certainly also provide tools to filter or search logs on particular objects, over a specific period of time, or concerning a particular operator.
example: During their conception, the description of the missions will evolve and, through the audit trail, you'll be able to track and understand the changes they undergo, and which actor in the design chain initiated them before the final planning.
Approvals of actions
Some sensitive tasks or actions will undoubtedly emerge over time. Your organization, through its managers, will then wish to implement more or less advanced review and approval mechanisms for these actions. The aim is to prevent an operator from executing risky or unusual actions for your organization, on their own.
A task could, either mandatorily or conditionally, require validation from a reviewer (another operator, a manager, etc.) before its formal execution to impact your data system.
example: A scientist discovers a new exoplanet and decides to enter it into your application. Approval will be required from one of their peers who will validate their analysis before approving or rejecting this discovery and entry in the application. This approval step is implemented because it would be extremely damaging for your organization to plan a mission to this exoplanet if it did not exist in reality.
Comments on objects
In many tools, collaboration is often facilitated by the ability to provide ideas, feedback, challenges, or simply context on data. Your operators may possibly ask you sooner or later to be able to annotate the data in your application with metadata. Being able to mention other operators on an object being worked on will also, via a notification system, allow them to be solicited to expose a reflection in a collaborative manner.
example: The design of a mission will likely require the writing of notes or comments to share outstanding questions. Scientists could be solicited (through mentions) to provide insights on the questions related to the mission; ideal launch dates, asteroid clouds to avoid, nature of the soil of the targeted exoplanet, etc.
Assignment of records
In order to evenly distribute the workload among operators and ensure that they do not process the same objects simultaneously, it will probably be necessary to implement systems for manual or automatic assignment of objects to available operators. This configuration will have even more impact if the targeted workflow is frequent and involves a large number of operators.
example: Let’s imagine that your system has integrated an open application system for publicly shared missions. The processing of applications with interesting profiles should be done efficiently among specialized operators dedicated to this task. Assignment will enable unique processing, thereby preventing operators from duplicating work.
Managers view
To oversee and monitor all operational activities of your organization, managers might naturally ask for dashboards that provide aggregated views of operational activities.
example: The manager of a scientific team might want to visualize the number of stars and exoplanets discoveries, including the percentage of "Terrestrial" or "Super Earth" planets, which are suitable for human settlement. A manager of missions planners, on the other hand, will be interested in the progress of missions definition and the handling of volunteer applications for exploration missions.
Conclusion

Through this story, which may have been just a dream..., you realize the depth of the subjects that open up to you after imagining and designing a simple CRUD application. Just like the universe, your application's functional surface will probably continue to expand indefinitely, and, you will need to be the permanent guarantor of its smooth operation on the variety of aspects mentioned here.